Step 1: Create a new signature template
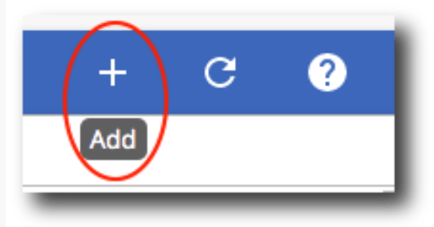
1. Click the Add button in the top right corner.
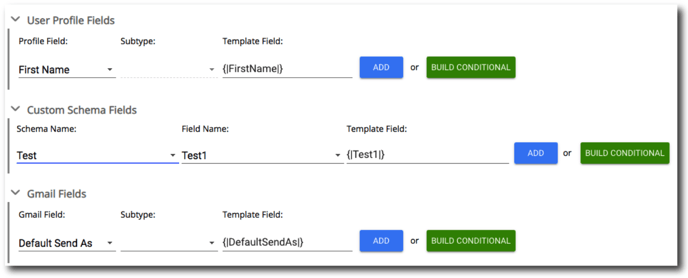
2. Add the desired profiled fields, custom schema fields, Gmail fields, or conditionals. An overview of each section is listed below:
-
User Profile Fields: This section allows you to include information from the user's profile. Some of the profile fields have subtypes which can be selected from the "Subtype" drop-down menu. Once you have selected a profile field and a subtype, click on the Add button to add that field to the signature template. Note: User profile information can be edited in Directory > User Profiles.
-
Custom Schema Fields: This section allows you to include schemas for custom attributes from the user's profile. Once you have selected a schema, click on the Add button to add that field to the signature template. Note: Schemas for custom attributes can be edited in a user's profile by going to Profile Information > Custom Attributes. You can use schemas to add custom fields to user profiles. You can use these fields to store information such as the projects your users work on, their physical locations, their hire dates, or whatever else fits your business needs.
-
Gmail Fields: This section allows you to include Gmail fields from the user's profile. Once you have selected a field, click on the Add button to add that field to the signature template.
-
Build Conditional: The Build Conditional feature allows you to place text before and after a profile field only if that field exists for the user. Click the Build Conditional button to enable this section. When you select a profile field and subtype, the Template Field is automatically populated.
Any text you enter in the Before Field and the After Field will display in the signature only if the user's profile contains information in the corresponding profile field. To add a conditional field to signature template, click Add to the right of the Conditional Builder.
If you wish to use the literal pipe character "|" in your template then you can escape the character, which will allow the signature template builder to accept it as a literal character and not a delimiter. As an example:
[|BEFORE \| EMAIL \| |PrimaryEmail| \| AFTER \| EMAIL|]
will translate to
BEFORE | EMAIL | corry@gpanel.info | AFTER | EMAIL
3. Customize the layout of your signature. You can customize your signature layout with the various Rich Text editing tools.

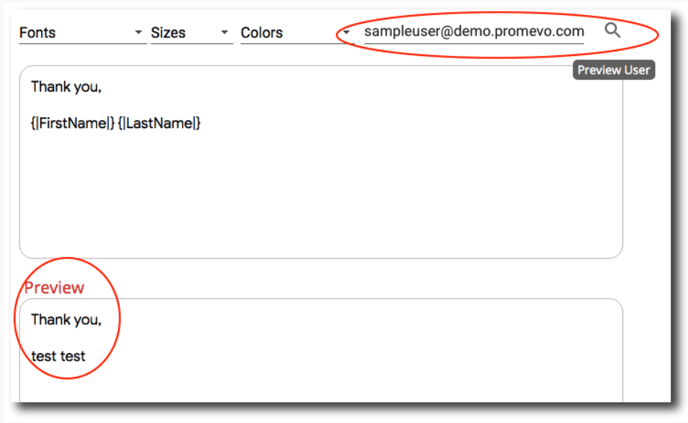
4. As you are customizing the signature template, you can enter a user and preview the changes to their signature. Click Preview User and the preview will appear in the preview panel.
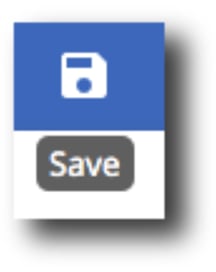
4. After you have completed your new signature template, click the Save button.
5. Enter the template name and optional description. Then, click Save.
Step 2: Configure template targets
Now that you have your template created, you need to configure the template targets. This means you are configuring which users, groups, org units, or domains you want to assign the template to.
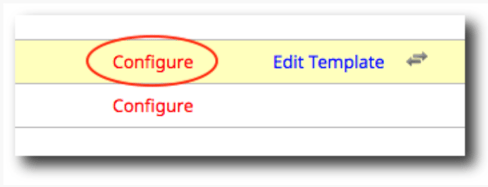
1. Click the red Configure link next to the Signature Template that you just created to configure the targets.
2. Enable or Disable the Manual Run, Set Schedule, Act on All Send As Addresses, Act on Default Send As Addresses, and Act on Primary Send As Addresses toggles.
-
If you enable the Manual Run, the signature template will be applied only when you run the template.
-
If you enable the Set Schedule, the template will be applied automatically on a schedule that you've configured.
-
If you enable Act on All Send As Addresses, all "Send As" signatures will be changed to this template. Selecting this will also include the default and primary "Send As" addresses.
-
If you enable Act on Default Send As Addresses, the default "Send As" signature will be changed to this template.
If you enable Act on Primary Send As Addresses, the primary "Send As" signature will be changed to this template.
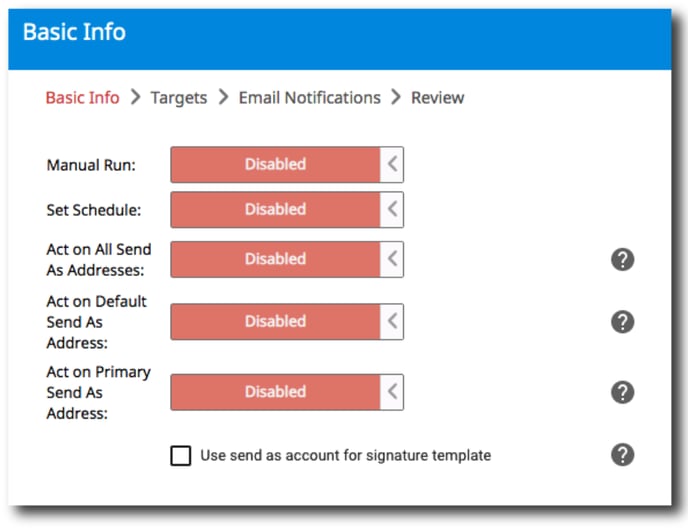
3. Select whether you'd like to use send as account for signature template. If you check this box, this will cause the signature to use the "Send As" account for any templated fields.
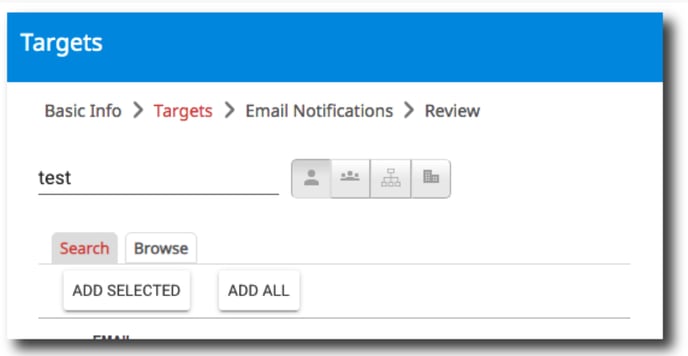
4. Next, select the target users to apply the Signature Template to. Type the desired user, group, org unit, or domain in the search box and a list will appear. Click either Add All to add the entire list or Add Selected to pick and choose specific line items. Click Next when you've added the target users.
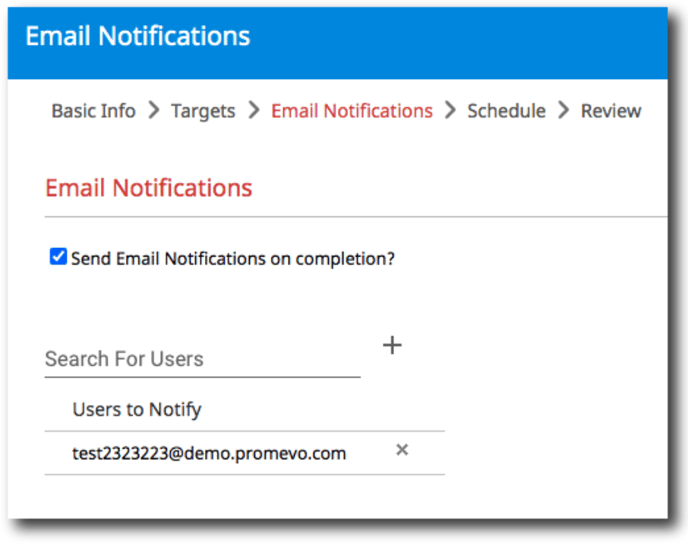
5. Select whether you'd like to send email notifications on completion. You can add users to notify by entering their name in the text box, selecting the user, and then click the + icon. If you don't want to send email notifications on completion, uncheck this checkbox.
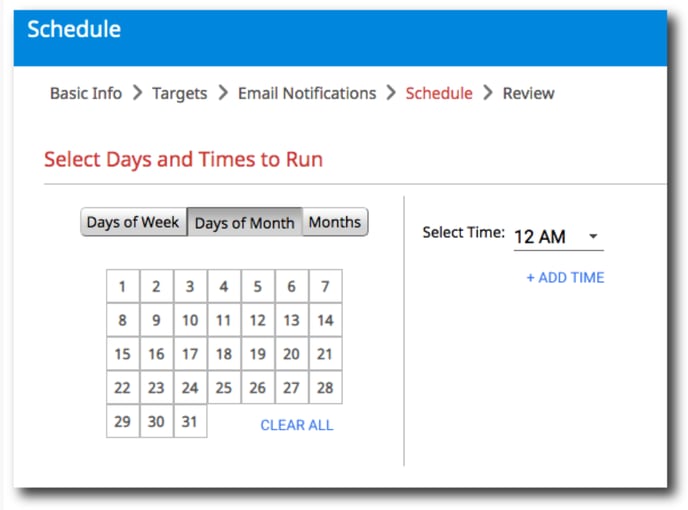
6. If you chose the option to apply the signature templates on a schedule, then you will be prompted to set the schedule for the template run on.
You can choose based on Days of the Week, Days of the Month, or Months. You will also be able to configure the Times that the template runs and any users that will receive an email notification.
7. Finally, review and verify your settings and click Submit.