Create a Resource Calendar
1. Navigate to Calendars > Resource Calendars. Then, click Add Calendar in the top right corner.

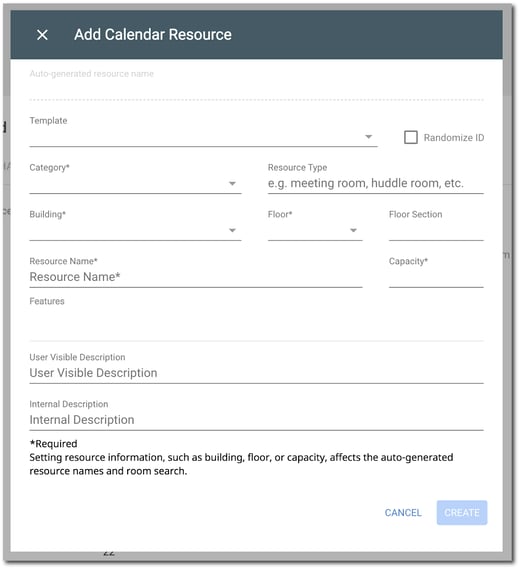
2. This will bring up the creation popup, this is where you will setup the resource. Any required field is marked via an asterisk. Each field is defined below:
-
Auto-generated resource name: This is not actionable. It is a system created name based off of the fields set.
-
Category: Category in which the resource belongs, there are 3 available categories.
-
Category Unknown: Used for Legacy resources, those in which you do not wish to have an Building, Floor, or features set. Equates to Google's "No category set."
-
Conference Room: Resources used for meetings or conferences that can be as small as a phone room.
-
Other: Resources that aren't used for meetings. For example, a company car.
-
-
Resource Type: This is an optional field that you can set to provide more details about what the resource is. For example, if the resource is a movable station, you could enter "Mobile cart."
-
Building: What Building you would like to associate the resource with.
-
Floor: What floor of the building does the resource reside on.
-
Floor Section: Where the resource is on the floor. For example, if the resource is in the media lab on floor 4, you could enter "Media Lab."
-
Resource Name: Name of the resource.
-
Capacity: This is an optional field in which you can list the capacity of an resource. Typically used for meeting rooms.
-
Features: Choose to list pre-defined features for the resource. These are not created here, they are instead created within the "Features" module.
-
User visible description: Description of the resource that users outside your domain can see if they are invited to an event. Think of this as an "Public" description.
-
Internal Description: Define an description that only internal users can see.
Once you've entered all details, click Create.

