- Knowledge Base
- gPanel Support
- Role Manager
-
Google Workspace Support
-
gPanel Support
- Getting Started
- User Portal
- Users
- General Settings
- Gmail Settings
- Directory
- Groups
- Group Templates
- Organizational Units
- Shared Contacts
- Contact Sync
- Calendars
- Resource Calendars
- Resource Templates
- Drive
- Drive Explorer
- Drive Search
- Owner Transfer Logs
- Drive Sweep
- Shared Drives
- Sites
- Devices
- Reports
- Tools
- Policies
- Signature Templates
- Bulk Operations
- Gmail Export
- Decommissioning
- Gmail Deletion
- Administration
- Domain Service Errors
- Indexing
- Labs
- Logging
- Role Manager
- gPanel API
- Settings
- Plan and Billing
-
Google ChromeOS Support
-
Google Admin Console Support
-
Google Meet
Create a Role
1. To get started, navigate to Administration > Role Manager, then click the + icon in the top right.
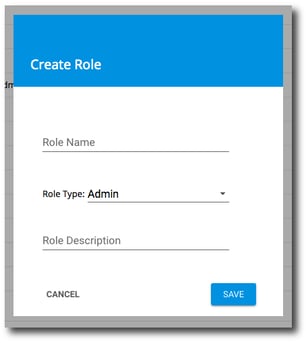
2. The create role window will appear. Enter the name of the role, select a role type, and enter the role description.
In the roll type drop down menu you will see two types of roles: Admin and User.
-
Admin: Will have none of the permissions selected, but includes options for all permissions.
-
User: Will have none of the permissions selected, and only includes user view permissions.
Click Save once you are finished.
Now that the role is created, you can edit it to select permissions, add users, exclude users, and more. Click here for instructions on how to edit a role.